Link Settings

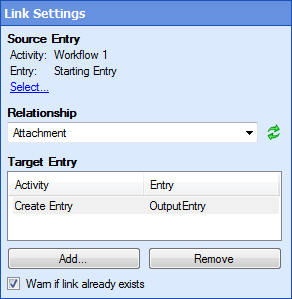
This property box determines which entries will be linked with the Create Link activity and what their document relationship will be.

Note: You can only create links to eight items with this activity. Those items can be single entries or a group of entries returned by the Find Entries or Search Repository activities. For example, if the folder Meeting Minutes has a hundred entries and you use a Find Entries activity to find all entries in that folder, the Output Entries for that Find Entries activity would be one item even though it contains 100 entries.

To configure Link Settings

  1. Add the Create Link activity to your workflow definition by dragging it from the Toolbox Pane and dropping it in the Designer Pane.
  2. Select the activity in the Designer Pane.
  3. Under ClosedLink Settings in the Properties Pane, configure the following settings to choose which documents to link together and to define their relationship.
  4. Source Entry: Click Select to choose the entry you want to link to another entry. Choose an entry from the Select Entry dialog box.
  5. Relationship: Use the drop-down menu to define the type of document relationship for the entries. More information.
  6. Target Entry: Click Add to choose the entries you want to link to the Source Entry. Choose an entry from the Select Entry dialog box.
  7. Optional: Click Add again to link more than one Target Entry to the Source Entry.
  8. Optional: Click Remove to remove a Target Entry from the document relationship.
  9. Select Warn if link already exists to report a warning in the Messages Tab of the instance details if the activity tries to link two entries that already have the specified relationship.

This documentation is specific to version 9.0. You can find the most up-to-date help files for the latest version at Current Online Laserfiche Product Help Files.

For further help or feedback, please see the Laserfiche Support Site.


© 2013 Laserfiche